How To Screen Record On iPhone?
Screen recording on an iPhone is easy and handy, especially when you want to capture something cool on your Screen. Here’s a step-by-step guide to get you started:
- Add the Screen Recording Feature to the Control Center: First, ensure you’ve got the screen recording button right where you need it. Go to “Settings,” then tap on “Control Center.” Here, you’ll find “Customize Controls.” Tap on that, and you’ll see a list of features you can add to your Control Center. Look for “Screen Recording” and tap the green plus (+) icon next to it. Voila! It’s now in your Control Center.
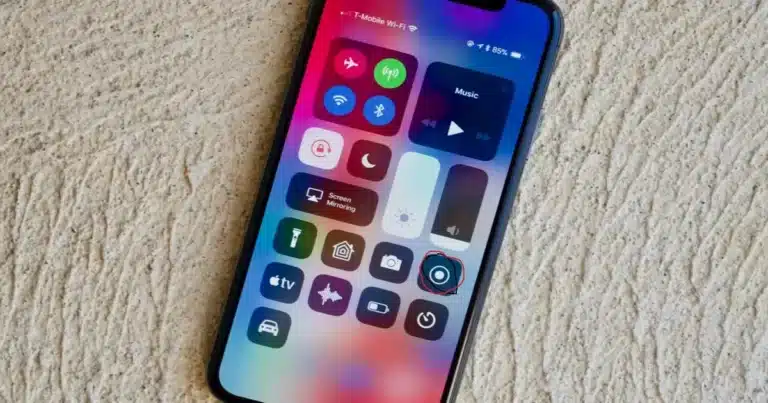
- Access Control Center for Screen Recording: Now, when you want to start recording, it’s a piece of cake. If you’ve got an iPhone X or later, swipe down from the upper-right corner of your Screen. You’ll swipe up from the Screen’s bottom edge if your iPhone is older, like the iPhone 8 or earlier. This brings up the Control Center.
- Start Recording: You’ll spot the screen recording icon in the Control Center – it looks like a solid circle inside a ring. Tap it, and you have a 3-second countdown before the recording starts. If you want to capture sound, press and hold the screen recording icon, and then tap the microphone icon to turn it on.
- Record Your Screen: You’re now recording! Everything on your Screen, including notifications, will be captured. So, if you don’t want to avoid certain things in your recording, turn on Do Not Disturb or swipe away notifications as they pop up.
- Stop Recording: Done recording? Return to the Control Center and tap the screen recording icon again. Or tap the red status bar at the top of your Screen and hit “Stop.” Your video will be saved automatically in the Photos app.
- Check Out Your Recording: Head to the Photos app for your screen recording. From here, you can watch it, edit it, or share it with your friends.
Introduction to Screen Recording on iPhone
In today’s fast-paced digital world, sharing information quickly and effectively is more critical than ever. With the advent of smartphones, mainly iPhones, capturing and sharing screen content has become a routine task for many.
This is where the Screen recording feature on an iPhone comes into play, offering a seamless way to record everything that happens on your Screen.
Screen recording on an iPhone is not just a tool; it’s a gateway to creativity and efficiency. Whether you’re a teacher creating a tutorial, a gamer showing off your skills, or a professional preparing a presentation, this feature is handy.
It’s an integral part of our digital lives, enabling us to record and share our screen activities easily.
Understanding the Concept: Screen Recording on iPhone
Screen recording on an iPhone refers to capturing what’s happening on your Screen as a video file. This feature, embedded within the iOS operating system, enables users to record their interactions with apps, display features, and any activity on their Screen. It’s like having a camera on your phone’s display to record everything you do.
But what exactly does this mean for an iPhone user? Simply put, it opens up a world of possibilities. You can record a step-by-step tutorial on using an app, capture a weird bug to show tech support or save snippets of a video call with loved ones.
It’s convenient for gamers who wish to record their gameplay or for professionals who need to create instructional content.
The Complete Guide to Screen Recording on Your iPhone
Screen recording on an iPhone is a straightforward process, but it’s packed with nuances that can make your recordings stand out. Here, we’ll walk through the procedure, providing tips and insights to enhance your screen recording experience.
Getting Started: Setting Up Screen Recording
- Adding Screen Recording to Control Center: Before you start, ensure the screen recording feature is accessible in your iPhone’s Control Center. Go to ‘Settings,’ tap ‘Control Center,’ and then ‘Customize Controls.’ Find ‘Screen Recording’ and add it to your Control Center.
- Accessing Control Center: For iPhone X or later, swipe down from the Screen’s upper-right corner for iPhone X or later. On older models, swipe up from the bottom edge.
Recording Your Screen
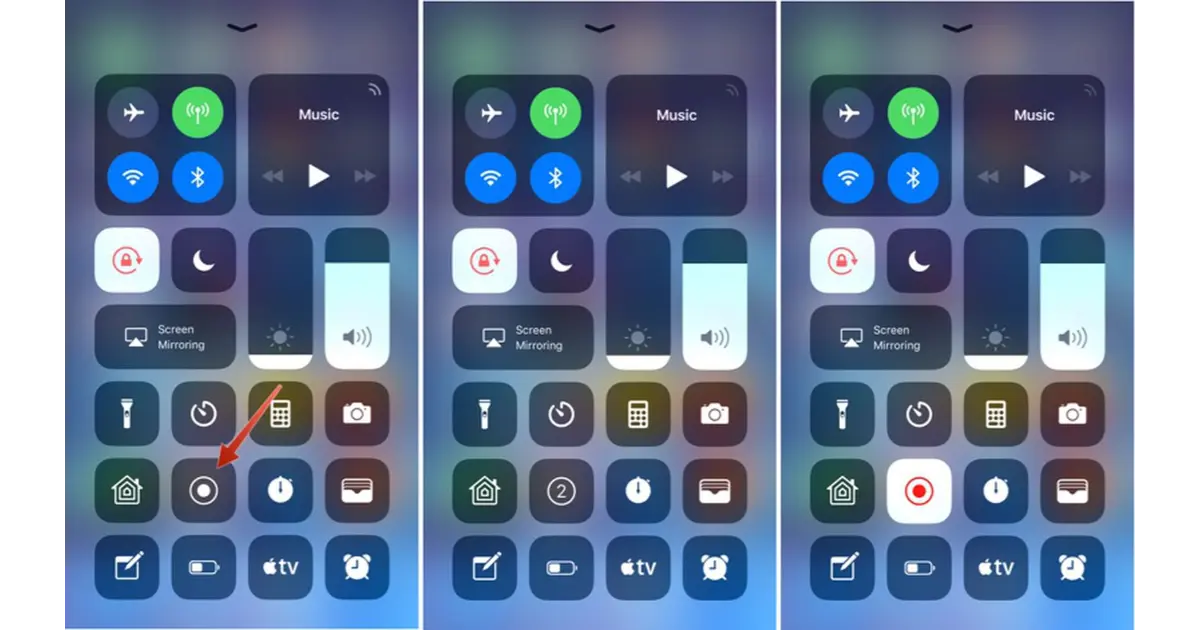
- Initiating the Recording: In the Control Center, tap the screen recording icon – a circle within a circle. A three-second countdown begins, giving you time to navigate to the Screen you wish to record. Press and hold the icon to record audio, then tap the microphone.
- Capturing the Action: Your iPhone records everything on the Screen. Remember, notifications and other phone activities will also be charged.
- Concluding the Recording: To stop, open Control Center and tap the icon again, or tap the red status bar at the top of your Screen and select ‘Stop.’
After Recording
- , Viewing, and Sharing Your Recording: The Photos app automatically saves Your screen recording. You can view, edit, or share it from here as needed.
Advanced Tips and Tricks
- Do Not Disturb Mode: Activate this mode to prevent unexpected notifications during recording.
- Editing Your Recording: Use the Photos app to trim the beginning and end of your video.
- Combining Recordings: Consider using iMovie or a similar app to connect multiple screen recordings for a more comprehensive video.
Table: Quick Guide to Screen Recording on iPhone
| Action | Steps |
| Add to Control Center | Settings > Control Center > Customize Controls > Add Screen Recording |
| Start Recording | Swipe to access Control Center > Tap Screen Recording icon |
| Stop Recording | Open Control Center > Tap Screen Recording icon or Red Status Bar > Stop |
| View/Edit/Share Recording | Open Photos app |
Advanced Applications and Tips for iPhone Screen Recording
In this additional section, we delve deeper into the practical applications and advanced tips for iPhone screen recording, helping you leverage this feature to its fullest potential.
Advanced Applications in Different Fields

- of Education: Teachers and educators can create instructional videos showing step-by-step processes in educational apps or digital textbooks.
- Gaming: Gamers can record their gameplay to share strategies, highlight reel moments, or review their performances.
- Professional Workspaces: Business professionals can use screen recordings to create detailed presentations and demo apps or as a tool for providing clear, visual feedback.
- Creative Arts: Artists and designers can record their creative process in digital art apps, offering insights into their techniques for followers and students.
- Tech Support: Screen recordings can effectively show the problem in action for troubleshooting, providing clear context to support teams.
Pro Tips for Enhanced Screen Recordings
- Optimize Video Quality: Adjust your iPhone’s screen brightness and ensure a stable internet connection for streaming content to provide the best video quality.
- Record in Landscape Mode: Use your iPhone in landscape mode for a more expansive view, especially useful for gameplay and tutorials.
- Narrate as You Record: If you’ve enabled the microphone, narrate your actions. This adds an instructional or storytelling element to your recordings.
- Utilize Editing Apps: For more advanced editing, beyond trimming, consider third-party apps that offer features like adding text, transitions, and background music.
- Be Mindful of Storage: High-quality screen recordings can occupy significant storage space. Regularly transfer files to cloud storage or an external device to free up space on your iPhone.
Table: Real-World Applications of Screen Recording
| Field | Application |
| Education | Creating instructional videos |
| Gaming | Sharing gameplay and strategies |
| Professional | Making presentations and app demos |
| Creative Arts | Showcasing digital art techniques |
| Tech Support | Documenting and sharing issues |
Key Takeaways:
- Ease of Access: Adding the screen recording feature to the Control Center makes it readily accessible.
- Simplicity in Use: Starting and stopping a recording is just a swipe and tap away, making it user-friendly.
- Versatility: Screen recording serves various purposes, from educational to entertainment.
- Privacy Considerations: Remember to manage notifications and sensitive information while recording.
Frequently Asked Questions:
Q: Can I record audio with my screen recording?
A: You can record audio by long-pressing the screen recording icon in the Control Center and enabling the microphone.
Q: Are there any time limits on how long I can record?
A: There’s no set time limit for screen recording on the iPhone, but the available storage space on your device might constrain the duration.
Q: Where do my screen recordings get saved?
A: All screen recordings are automatically saved in the Photos app under ‘Videos.’
Q: Can I edit my screen recordings on my iPhone?
A: Yes, the Photos app allows basic editing, like trimming the length of the video.
Q: Is it possible to record phone calls or FaceTime calls?
A: Recording phone or FaceTime calls with the built-in screen recording feature is not supported due to privacy and legal considerations.
Final Thoughts
Screen recording on the iPhone is more than a feature; it’s a multifaceted tool that can enhance various aspects of our digital lives. From personal to professional use, its applications are vast and diverse. You can significantly boost your digital productivity and creativity by mastering screen recording and utilizing these advanced tips and applications.