How To Screen Record On Iphone 14 Plus?
Screen recording on the iPhone 14 Plus is a straightforward process that allows users to capture what is happening on their phone’s screen. This feature is handy for creating tutorials, recording gameplay, or saving video calls.
Have you ever wanted to share what’s on your iPhone screen with friends or needed to record a step-by-step guide for a particular app? The question How To Screen Record On iPhone 14 Plus? It might have crossed your mind.
The iPhone 14 Plus screen recording feature can be accessed through the Control Center. Once activated, it records everything you do on your screen until you stop it. The recorded video is then saved to your photo gallery, making it easy to share or edit.
Understanding Screen Recording on iPhone 14 Plus
Understanding screen recording on the iPhone 14 Plus is straightforward and user-friendly. This feature lets users capture everything happening on their screen, including audio, making it ideal for creating tutorials and gameplay videos.
Or they are saving video calls. To start, access the Control Center and tap the screen recording icon; a countdown begins, and then the recording starts. Users can include audio by long-pressing the icon and enabling the microphone.
Once the recording is complete, the video is saved automatically to the Photos app. From there, it can be edited, shared, or stored as needed. The iPhone 14 Plus ensures high-quality recordings with clear audio and smooth video.
This feature helps capture live events, create instructional content or document software bugs. The intuitive interface of the iPhone 14 Plus makes screen recording a hassle-free experience for all users.
Definition and basic concept of screen recording
Screen recording is a digital process of capturing the visual output of a computer screen or a portion of it. This technology records everything that appears on the screen, including moving images, texts, and cursor movements.
Screen recording is commonly used for creating tutorials, presentations, or capturing gameplay. It’s particularly useful in educational settings, where teachers can record lectures or demonstrations for students.
The process is simple and usually involves a software or application that records the screen’s content. Beneficial specific area of the screen they want to capture, and the software does the rest.
The recorded content is then saved as a video file, which can be edited, shared, or stored for future reference. Screen recording is widely accessible, with many operating systems offering built-in tools, and additional features can be found in third-party applications.
Key features of the iPhone 14 Plus screen recording
The iPhone 14 Plus offers an enhanced screen recording feature, making it easy to capture high-quality video of your screen. This is ideal for creating tutorials, showcasing apps, or saving memorable conversations. The process is straightforward:
Access the Control Center and tap the capturing icon. You can even include audio from your microphone, adding commentary or explanation to your recordings.
Additionally, the iPhone 14 Plus allows you to adjust the resolution and quality of the screen recordings, ensuring you get the perfect balance between file size and clarity. Once recorded, these videos can be easily edited, trimmed, and shared directly from the device.
They are providing a seamless experience for both casual and professional users. This feature is especially beneficial for content creators and educators, who often need to share screen-based content with their audience.
Accessing the screen recording button in the Control Center
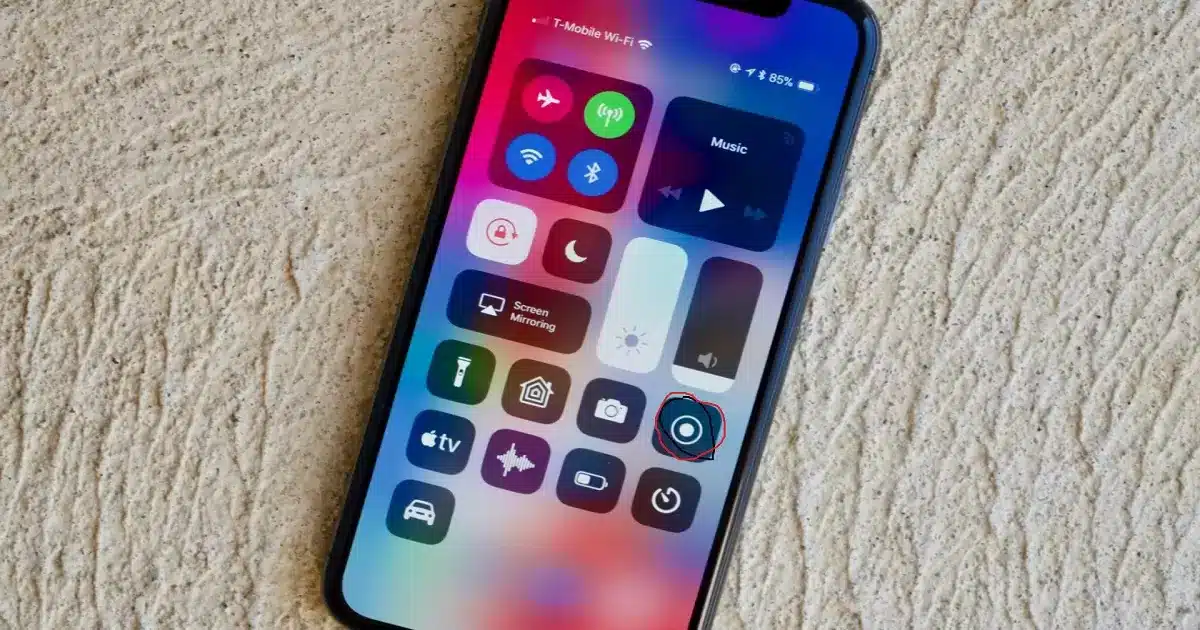
Accessing the screen recording button on the iPhone 14 Plus is a crucial step in learning “How To Screen Record On iPhone 14 Plus.” The process is simple and user-friendly. First, swipe down from the top-right corner of your iPhone 14 Plus screen to open the Control Center.
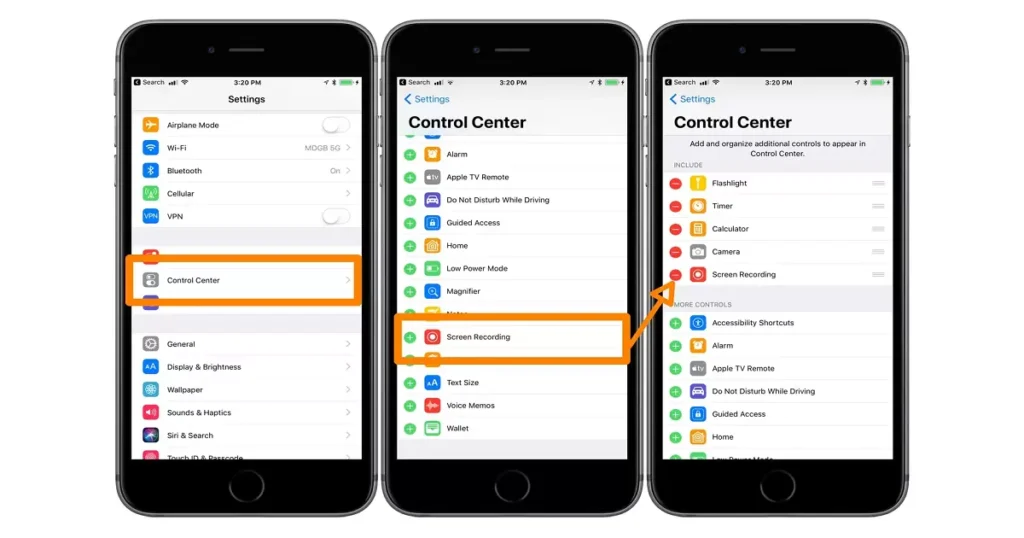
This is where you’ll find various shortcuts and controls, including the screen recording button. A circular icon represents it. If you don’t see it, you’ll need to add it to your Control Center through the Settings app.
Once you’ve located the screen recording button in the Control Center, you’re almost ready to capture your screen. Tap on this icon you must own will begin, giving you a brief moment to prepare before the recording starts.
Remember, everything on your screen, including notifications, will be recorded, so it’s wise to clear anything private or unnecessary before starting. This easy access makes screen recording a convenient tool on the iPhone 14 Plus.
Initiating the recording process
Initiating the screen recording process on your iPhone 14 Plus is straightforward. First, you need to access the Control Center. This is done by swiping down from the top-right corner of your screen. Here, you’ll find a variety of icons, but look for the one that resembles a solid circle inside a ring – that’s the screen recording button.
During the recording, you can use your iPhone as usual. Whether you’re demonstrating an app, capturing a game, or recording a video call, everything on your screen, along with the audio, will be registered.
If you want to capture sound from your microphone, long-press the screen recording icon before starting and turn on the microphone audio. Once you’re done, tap the red status bar at the top of your screen and confirm to stop the recording.
Tips for successful screen recording
A few simple tips can make a big difference when it comes to successful screen recording on your iPhone 14 Plus. First, ensure your device has enough storage space for the video file; screen recordings can quickly consume space, especially in high-quality settings.
Also, check your battery level or plug in your device during recording, as this process can drain the battery. Turning on ‘Do Not Disturb’ mode is a smart move to avoid unwanted notifications during your recording. Additionally, close any unnecessary apps running in the background to improve the performance of your device and ensure a smoother recording.
Remember to clean up your screen before you start, removing any sensitive information or clutter you don’t want to be recorded. Test your microphone beforehand to ensure transparent sound quality if you’re recording with audio.
For tutorials or demonstrations, plan your steps to make your recording more concise and informative. Lastly, practice makes you better at creating clean, professional-looking recordings if you’re recording with auditioning screen recordings on your iPhone 14 Plus.
During the Recording
It’s essential to manage your screen activities carefully during a screen recording on your iPhone 14 Plus. This includes smoothly navigating through apps and avoiding unnecessary screen touches. Keep in mind that everything on the screen is being captured. If your recording includes audio, speak clearly and ensure minimal background noises.
To pause the recording, reaccess the Control Center. This allows you to stop recording temporarily if needed. Resuming is just as easy – tap the red status bar at the top of your screen and confirm. Remember, all actions during the recording, including pausing and resuming, are captured in the final video.
Managing screen activities while recording
Managing what happens on-screen is crucial when recording your iPhone 14 Plus screen. Keep your screen movements smooth and deliberate, focusing on the specific task you’re demonstrating. Avoid opening unrelated apps or notifications, as the recording will capture these. It’s helpful to plan your actions so your recording stays on topic and easy to follow.
If you’re recording a tutorial or a game, ensure that all necessary apps are open and ready. Remember, everything visible on your screen, including incoming calls and messages, will be part of the recording. Being organized and mindful of on-screen activity ensures a professional-looking final video.
Pausing and resuming screen recording
Pausing and resuming your screen recording on the iPhone 14 Plus is a seamless process. When you’re recording and need a brief pause, reaccess the Control Center. Here, the recording icon is glowing red, indicating an ongoing recording.
A quick tap on this icon will pause the recording, allowing you to manage your screen without recording unnecessary content. This feature is handy if you’re creating a tutorial or recording a gameplay session and need a break.
To resume your recording, revisit the Control Center and tap the screen recording icon again. The recording will continue from where you left off, seamlessly integrating the paused period.
This functionality ensures that your final video is concise and accessible to unwanted segments, making your content more engaging and professional. Whether you’re a content creator or just sharing moments with friends, mastering this feature enhances your screen recording experience.
| Feature | Description |
| Pausing Recording | Temporarily stop recording without ending the session. |
| Resuming Recording | Continue recording from where you paused, seamlessly. |
| Accessibility | Easy access via the Control Center for quick action. |
| Audio Continuity | Maintains audio recording during pause and resume. |
| Notification | Visual and audio cues to indicate pause and resume status. |
Ensuring audio is captured (if required)
Capturing audio during your iPhone 14 Plus screen recording is a valuable feature. To ensure audio is recorded, you need to adjust a simple setting. Before recording, deeply press or long-press the screen recording icon in the Control Center.
Then, tap the microphone icon to turn it on. This will capture both the internal and external sounds from the app you are recording through the iPhone’s microphone.
Remember, your iPhone records everything it hears when the microphone is on. This includes background noises and your voice. So, if you’re recording a tutorial or a gameplay, ensure you’re in a quiet environment. This ensures that the audio in your recording is clear and accessible from unwanted sounds.
Ending the Screen Recording
Ending a screen recording is a straightforward process. It usually involves clicking a “stop” button on the recording software. Once stopped, the video is typically saved automatically to a predetermined folder.
The file format varies depending on the software, but standard formats include MP4, AVI, and MOV. Users can then access the recording for review, editing, or sharing.
This process is essential for creating instructional videos, capturing gameplay, or documenting software bugs. It’s a valuable tool in both professional and personal settings. The simplicity of ending a screen recording makes it accessible to users of all skill levels, encouraging widespread use of this technology.
How to stop recording
There are simple steps to follow to stop recording, whether it’s audio, video, or a screen capture. First, ensure you’re using the appropriate software or device for the type of recording you’re doing. Apps like Audacity or a digital voice recorder are common for audio recordings.
For video, software like OBS Studio or a camera app on your smartphone works well. Screen captures are often like Snagit or the built-in screen record feature on many computers and smartphones.
Once you’re ready to stop recording, locate your software or device’s ‘stop’ button. A square icon usually represents this button. Click or press this button to halt the recording process.
After stopping, save your recording to avoid losing it. It’s essential to familiarize yourself with the saving process of your specific software or device. Remember, halting a recording promptly ensures you capture only the desired content and maintain the quality of your work.
Accessing and viewing the recorded content
Accessing and viewing recorded content has become increasingly straightforward and user-friendly. With technological advancements, many digital platforms now offer easy access to various recorded materials.
These platforms range from educational resources to entertainment media, catering to diverse interests and needs. The accessibility of such content allows individuals to explore and learn at their own pace, making knowledge and entertainment more readily available than ever before.
Viewing recorded content often requires just a few clicks, thanks to intuitive user interfaces and streamlined processes. Whether it’s for learning new skills, enjoying movies, or catching up on recorded content mismatches, it provides a convenient solution.
This ease of access saves time and empowers users to curate their learning and entertainment experiences, enhancing both their knowledge and quality of life.
Saving and sharing the screen recording
Saving and sharing screen recordings is a valuable skill in today’s digital age. It enables individuals to capture and preserve helpful information, tutorials, or memorable moments.
With screen recording, one can easily record video footage of their computer or SmartScreen. This is particularly useful for creating instructional videos, documenting software bugs, or recording an online meeting.
Once the recording is complete, sharing it becomes essential, especially in collaborative environments. Most devices allow users to save recordings in various formats.
They are making it easier to share across different platforms. Users can share these recordings via email, cloud storage, or social media, facilitating efficient communication and learning.
FAQs
How to Initiate Screen Recording on iPhone 14 Plus
To start screen recording on your iPhone 14 Plus, swipe to access the Control Center and tap the screen recording icon.
Adding Audio to Screen Recordings
You can include audio in your recordings by long-pressing the screen recording icon in the Control Center and enabling the microphone.
Stopping the Screen Recording
To stop recording, tap the red status bar at the top of your screen, return to the Control Center, and tap the screen recording icon again.
Locating the Recorded Video
Once stopped, the screen recording automatically saves to your Photos app, where you can view, edit, or share it.
Editing Screen Recordings on iPhone 14 Plus
Edit your screen recordings directly in the Photos app, where you can trim, add filters, or adjust other settings.
Conclusion
Screen recording on the iPhone 14 Plus is a versatile and user-friendly feature. It’s ideal for capturing content directly from your device, whether for professional tutorials, personal memories, or creative projects.
With the addition of audio recording, your screen captures become more dynamic and informative. The ease of editing and sharing directly from the Photos app enhances the overall utility of this feature.
The iPhone 14 Plus elevates the screen recording experience with its intuitive interface and quality options. This makes it a valuable tool for a wide range of users, from educators and content creators to everyday users who want to share moments or information with ease. The simplicity of starting, stopping, and managing recordings underlines the iPhone’s commitment to user-friendly technology.


4 Comments